Unbricking
Introduction
This procedure will take you through the restoration of your radio using a simple JTAG cable, with software we have provided.
Prerequisites
In order to recover a bricked radio, you will need:
- JTAG cable
- Software for flashing over JTAG
- An image to flash to the radio
- A lot of patience
JTAG Cables
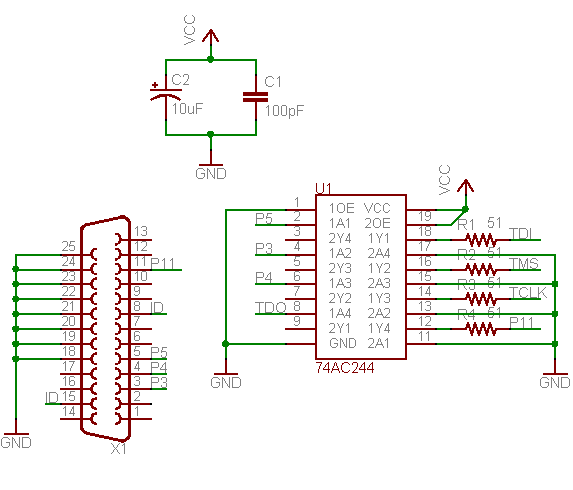
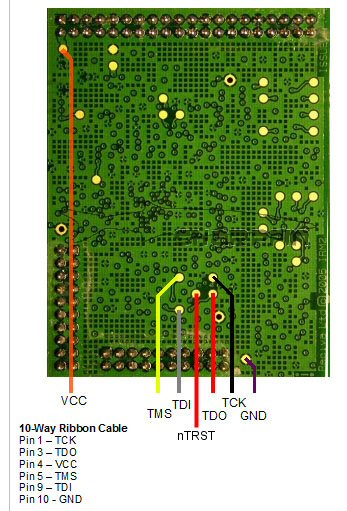
'Wiggler' compatible cables are a popular low-cost cable, and well supported by the free jtag tools. Plans to make your own are widely available, and prebuilt ones can be found cheaply on ebay and similar sites. A "universal" wiggler will come with bare wires which can be soldered to the jtag test points on the barracuda board.
JTAG Flashing Software
The application sjf2410, along with the error correction code from the linux kernel have been modified to produce a bespoke utility for the baracuda module's NAND flash. It uses the wiggler cable in the parallel port.
- Sharpflash-src-0.1.tar.bz2 - Source Code (0.1 Alpha Test Version)
This version of sharpflash supports reading and writing of the NAND flash using the wiggler parallel port interface.
Reading Flash Images
You can make a back-up of your flash via JTAG using the following format commands:
sharpflash -r kernel-mtd.bin 004000 0fc000
Will extract the contents of the kernel partition into 'kernel-mtd1.bin', which is a nanddump format file, skipping any bad sectors as it goes. Have a look at Reciva NAND Flash for the background on the flash structure.
Sharpfin Flash Programmer - http://www.sharpfin.zevv.nl/
.
Found S3C2410 processor on JTAG Cable
Found K9F2808UOC on processor
Reading NAND Flash:
 destination   = kernel-mtd1.bin
 start addr    = 0x4000
 length        = 0xFC000
.
Address  Progress                          Remaining
-------  --------------------------------  ---------
0000000  rrrrrrrrrrrrrrrrrrrrrrrrrrrrrrrr    9h 12m
0004000  rrrrrrrrrrrrrrrrrrrrrrrrrrrrrrrr    9h 11m
0008000  rrrrrr
Getting Bad Block Information
This is not needed for programming, however it is recommended that you keep a record of the bad blocks marked by the manufacturer as bad, because this information is stored in re-programmable memory, and it may be useful to be able to distinguish between manufacturer-defined bad blocks, and user-defined bad blocks.
sharpflash -b
The program will output several lines, with each '.' representing a 16K block which is marked as good, and a 'b' for each block which is marked bad.
Sharpfin Flash Programmer - http://www.sharpfin.zevv.nl/
.
Found S3C2410 processor on JTAG Cable
Found K9F2808UOC on processor
Checking NAND Blocks
 0000000: ................................................................
 0100000: bbbbbbbbbbbbbbbbbbbbbbbbbbbbbbbb...............
Writing Flash Images
This process takes a long time to run - roughly 80 seconds per 16KBytes, so a full 16Mb flash will take about 24 hours.
When you are choosing your images to write, make sure that they are in 'nanddump' format. Writing images to flash that are not in 'nanddump' format will result in valid blocks being marked bad
sharpflash -w boot-mtd.bin 000000 04000
Will write the boot sector from the file boot-mtd.bin, and will produce an output similar to this:
Sharpfin Flash Programmer - http://www.sharpfin.zevv.nl/
.
Found S3C2410 processor on JTAG Cable
Found K9F2808UOC on processor
Writing NAND Flash:
 source      = boot-mtd.bin
 start addr  = 0x0
 length      = 0x04000
.
Address  Progress                          Remaining
-------  --------------------------------  ---------
0000000  wwwwwwwwwwwwwwwwwwwwwwwwwwwwwwww    0h 00m

